Whether building a new building or renovating an existing one, drywall is often preferred over traditional wet plaster for the walls. Also called drylining or plasterboard, it is much quicker and easier to install than wet plaster, and you do not have to be a skilled professional to install it. Within no time, you can finish a room and have it ready for decorating without using heaters and waiting for the plaster to dry. If you will be using drywall in your project and do not have any experience with it, you can find some information and tips below to help you get started.
What is Drylining?
Drylining is gypsum sandwiched between layers of paper, and it gives a finished surface on a wall or a ceiling that is ready for decorating. When installed correctly, it gives you a smooth and flat surface, which is not always possible with older buildings that use traditional wet plaster. This technique offers several advantages over conventional plastering methods, including faster installation, minimal mess, and the ability to conceal wiring and insulation effectively.
Preparing For The Project
Before you dive headfirst into your project, you will want to do some planning and preparation to ensure everything goes smoothly. Some tips to help you get started are as follows:
- Assess The Space: You should start by evaluating the area you will be working on, looking for structural problems, locating electrical sockets, and anything else that can affect the installation of the plasterboard.
- Choose The Right Materials: You want to ensure that the drywall you use is high-quality and meets your project’s requirements. Before purchasing your drywall, look at the different types of drylining and consider its thickness, moisture resistance, and fire rating to ensure you get the one that best suits your requirements.
- Gather The Necessary Tools & Equipment: You must ensure you have all the correct equipment before you start hanging your drywall. The things you will need include a spirit level, plasterboard saw, screw gun, drywall screws, jointing tape and compound, sandpaper, and a ladder.
- Measure Twice: As the saying goes, “measure twice and cut once”, which can help ensure you get things correct and reduce wastage. Double-check dimensions before cutting plasterboard panels to size, minimising wastage, and ensuring a seamless fit.
Understanding the Process
Hanging drylining involves several sequential steps, and you will want to research online before you get started to help you with these. There are many online tutorial videos you can watch free of charge on platforms like YouTube, which can help you hang drylining when you have no experience.
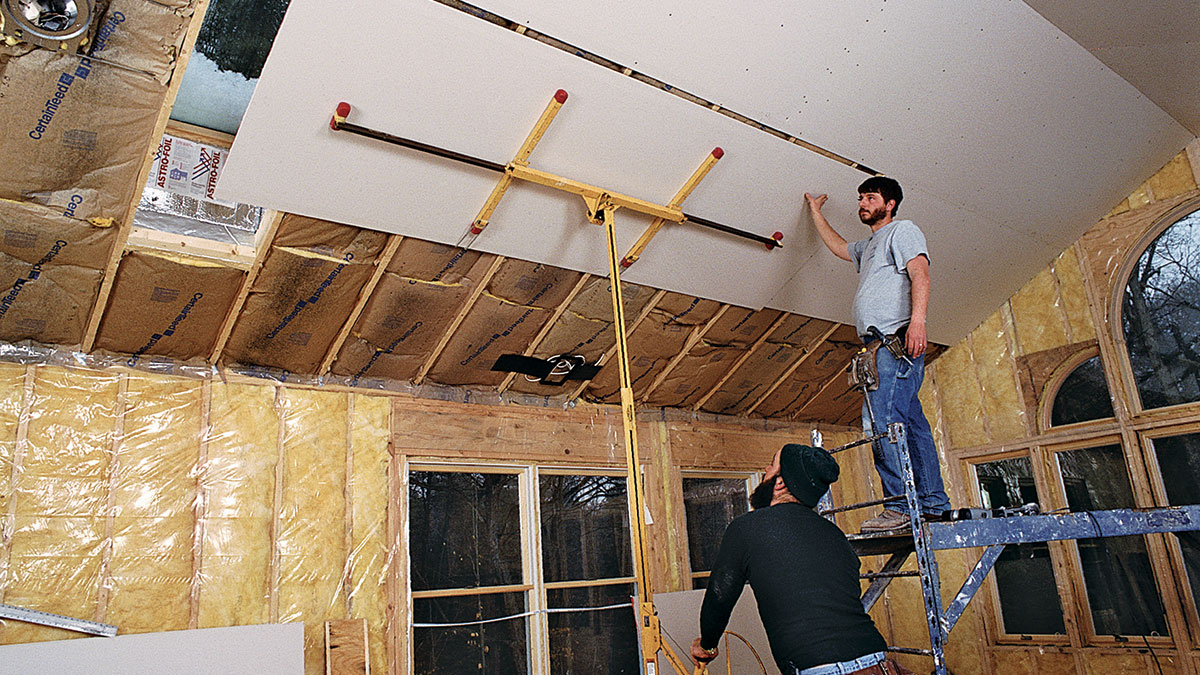
Marking & Cutting: You can start by marking the position of the drywall panels on the walls or ceiling. Use your spirit level to ensure the lines are straight, then mark and cut the plasterboard panels using the saw.
Fixing The Plasterboard: You will need to secure the plasterboard to the framework using the plaster screws and screw gun. Ensure that you drive the screws till they are level with the plasterboard, and do not over-tighten them, which can cause them to break.
Taping & Jointing: The next step is to apply jointing tape over all the seams of the drywall to cover the seams between the panels. You can then use the jointing compound to fill the gaps and smooth the surface to ensure a seamless finish.
Sanding & Priming: First, let the jointing compound dry, then start rubbing it with the sandpaper to ensure the joints in your plasterboard are smooth. Once the surface of the drywall is completely smooth, you can apply a primer before you paint it or add wallpaper, which enhances adhesion.
Common Challenges & Solutions
You will need to overcome some common challenges when installing drywall in your project. Some of these problems that can arise are as follows:
Uneven Surfaces: A problem in older buildings is that the walls are not straight or uneven. To combat this, you can use shims or packing behind the framework to create a level surface for plasterboard installation.
Electrical & Plumbing Obstacles: When encountering wiring or plumbing, carefully cut holes in the plasterboard to accommodate fixtures. Ensure proper insulation and safety measures are in place.
Moisture Concerns: In areas prone to moisture, such as bathrooms or kitchens, opt for moisture-resistant plasterboard to prevent damage and mould growth.
Jointing Issues: Achieving seamless joints requires skill and patience. Take your time when applying the jointing compound and sand the surface meticulously for a flawless finish.
You will also need to ensure that you use the correct PPE gear, such as gloves, goggles, and a dust mask, when installing drywall and that the space is well-ventilated. Take your time and try not to rush things until you get used to what you are doing. Even a novice can do a fantastic job installing plasterboard with patience and the correct tools and equipment.