To remove rust from brake discs without removing the wheel:
- Start the car.
- Drive slowly and apply the brakes firmly several times to scrape off surface rust using the brake pads.
- Be cautious and ensure safety while doing this.
Materials Needed A. List of required tools and supplies
Removing rust from brake discs without wheel removal is straightforward, but safety and brake effectiveness are paramount. Here’s a quick guide on how to do it:
Materials you’ll need:
- Jack and Jack stands
- Lug wrench
- Wire brush or a specialized brake cleaner tool
- Brake cleaner spray
- Brake pad spreader tool (optional)
- Rags or paper towels
- Safety glasses and gloves
Inspection
Check Brake Disc Condition:
- Visual Inspection: Examine the surface of the brake disc for any visible signs of wear, scoring, or damage. Look for grooves, cracks, or warping. If you notice any significant damage, it may be best to replace the brake disc.
- Rust and Corrosion: Assess the extent of rust on the brake disc. If the rust is severe and has deeply pitted the disc, it may affect braking performance, and replacement might be necessary.
- Thickness: Measure the thickness of the brake disc using a micrometer or caliper. Refer to your vehicle’s owner’s manual for the manufacturer’s specifications for minimum disc thickness. If the disc is below the recommended thickness, it should be replaced.
- Runout: Check for runout, which is the lateral (side-to-side) movement of the brake disc. Excessive runout can cause brake pulsation and should be addressed by a professional if it exceeds manufacturer specifications.
Consider Minimum Thickness Specifications:
- Consult the Manual: To find the manufacturer’s recommended brake disc thickness for your vehicle, consult your owner’s manual or a repair manual specific to your make and model.
- Measure Thickness: Using a micrometer or caliper, measure the thickness of the brake disc. Measure in multiple locations to ensure accuracy.
- Compare Measurements: Compare your measurements to the manufacturer’s minimum thickness specifications.
If the disc thickness is at or below the specified minimum, it’s time to replace the brake disc, as it may not provide safe and effective braking.
Keep in mind that brake discs are a critical safety component of your vehicle, and maintaining them within the manufacturer’s recommended specifications is essential for your safety.
Cleaning Process
Step-by-Step Instructions for Rust Removal:
Using a Wire Brush or Abrasive Pad:
- Ensure the vehicle is safely jacked up and secured with jack stands
- Locate the brake disc that needs rust removal. Turn the wheel to access it fully.
- Wear safety glasses and gloves for the protection of your eyes and hands.
- Gently use a wire brush or abrasive pad on the rusted areas of the brake disc, working in a back-and-forth motion to remove loose surface rust without excessive force.
- Continue to brush until the disc appears cleaner and most of the rust is removed. It’s normal for the disc to still have a slightly rough texture due to previous rust.
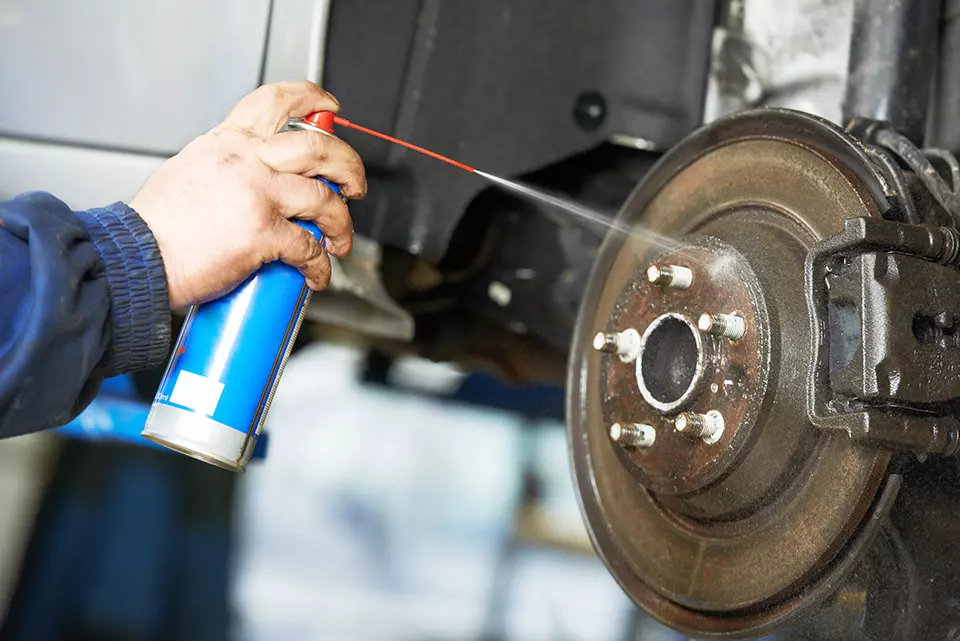
Applying Brake Cleaner:
- After brushing off the rust, spray a generous amount of brake cleaner onto the brake disc. The brake cleaner is designed to remove contaminants and any remaining rust.
- Allow the brake cleaner to sit for a minute or two to break down any remaining rust and contaminants.
- Be cautious with overspray; use a cardboard or rag shield to protect other components from the brake cleaner, especially if you have alloy wheels.
Wiping Down the Brake Discs:
- Clean the brake disc with a rag or paper towel to remove loosened rust and any brake cleaner residue.
- Continue wiping until the disc is clean and smooth to the touch. You may need to use multiple rags or towels if the disc is heavily rusted.
- Inspect the disc to ensure no visible rust or contaminants is remaining.
Remember that this method is suitable for light to moderate rust removal. If the brake disc has severe rust, deep grooves, or other issues, it’s safer and more effective to replace it or consult a professional mechanic.
After completing the cleaning process, reassemble the vehicle following the steps in section I, and make sure to perform a test drive in a safe area to ensure the brakes are working correctly.
Reassembly
Reattaching Wheel Covers or Hubcaps (if applicable):
Inspect and Clean: Before reattaching the wheel covers or hubcaps, inspect them for any damage or dirt. Wipe them down if necessary to ensure they are clean and debris-free.
Proper Alignment: Ensure that the wheel covers or hubcaps are properly aligned with the wheel. Some have notches or clips that need to fit into corresponding slots on the wheel.
Press or Tap into Place: Carefully position the wheel cover or hubcap over the wheel, aligning it with the valve stem hole (if applicable). You may need to press it firmly in place or gently tap it with the palm of your hand to secure it. Some hubcaps have retention clips that need to snap into place.
Secure in Position: Double-check that the wheel cover or hubcap is securely in position and doesn’t wobble. Ensure that it’s flush with the wheel and properly seated.
Tighten Lug Nuts: Use your lug wrench to further tighten the lug nuts in a star or crisscross pattern to the manufacturer’s recommended torque specification. This step is crucial for your safety and the performance of your brakes.
Lower the Vehicle: Carefully remove the jack stands and lower the vehicle to the ground by operating the jack. Make sure the vehicle is resting on all four wheels before fully removing the jack.
Final Lug Nut Check: After lowering the vehicle, perform a final check on the lug nuts to ensure they are properly tightened. Check each lug nut one more time to confirm that they are secure.
Test Drive: Before hitting the road, take a short test drive at low speeds in a safe area to ensure the brakes and the reattached wheel covers or hubcaps are functioning correctly.
Properly securing the wheel covers or hubcaps is important not only for aesthetic reasons but also to prevent them from coming loose while driving, which could pose a safety risk.
Lowering the Vehicle
Safely Remove Jack Stands and Lower the Car:
Ensure Stability: Before lowering the vehicle, double-check that it is stable and resting securely on the jack stands.
Locate the Jack Stands: Locate the jack stands that are supporting the vehicle. They are usually positioned under the vehicle’s frame or designated lift points.
Position Yourself Safely: Stand to the side of the vehicle, not under it, when removing the jack stands. This positioning minimizes the risk in case of any unforeseen movement.
Remove Jack Stands One at a Time: If you have four jack stands (one at each wheel location), remove them one at a time, starting with the one closest to you. Use the following steps for each jack stand:
a. Place a hand on the jack stand and use the jack handle or lever to raise it slightly to take the weight off the stand.
b. Carefully remove the safety pin or locking mechanism, if applicable, to release the stand.
c. Slowly lower the jack stand in a controlled manner until it is clear of the vehicle. Keep your hands and body away from the area where the stand is being lowered.
d. Set the jack stand aside in a safe location.
Lower the Vehicle: Once all the jack stands have been removed, use the jack to slowly and carefully lower the vehicle to the ground. Lower it until all four wheels are in contact with the ground and the vehicle is fully supported by its suspension.
Final Check: After the vehicle is back on the ground, do a final inspection to ensure that it is sitting evenly and securely. Make sure there is no visible damage and all wheels are in proper alignment.
Proper Storage: Store the jack stands and the jack in a safe and secure location, ready for future use.
Brake Testing

Testing the Brakes Before Driving:
Before driving, perform a brake test to ensure your brakes work safely. Here’s how:
- Start the Engine: Make sure your vehicle’s engine is running. This is necessary to have vacuum assistance for the brake system.
- Gently Apply the Brakes: While the vehicle is stationary, gently press the brake pedal to see if it engages smoothly. There should be no unusual noises, vibrations, or resistance when pressing the pedal. The pedal should feel firm and responsive.
- Check for Brake Warning Lights: Look at the dashboard to ensure there are no warning lights related to the brakes or the brake system. If you see any warning lights, it indicates a problem that should be addressed before driving.
- Perform a Slow Roll Test: Release the parking brake and slowly drive the vehicle in a safe and open area, such as a parking lot. Pay attention to the following as you drive at low speeds (around 5-10 mph):
Braking Responsiveness: Test the brakes by gently applying the pedal. The vehicle should come to a smooth and controlled stop without any pulling to one side.
Listen for Unusual Noises: Listen for any unusual squealing, grinding, or other noise when applying the brakes. Unusual noises may indicate brake issues that require attention.
Steering Wheel Alignment: Ensure that the steering wheel remains straight when braking. If it pulls to one side, it could be a sign of brake or alignment problems.
- Test at Higher Speeds: If the slow roll test is successful, you can increase your speed to around 30 mph and perform additional brake tests. Ensure the vehicle stops smoothly and without any issues.
- Final Checks: After completing the brake tests, turn off the engine and visually inspect the brake components, including the brake discs, brake pads, and calipers, to make sure everything looks secure and in good condition.
- Address Any Issues: If you notice any problems during the brake tests, such as unusual noises, poor braking performance, or warning lights, it’s essential to address these issues before driving. Consult a professional mechanic if needed.
A brake test is vital for your safety when driving. If you’re unsure about your brakes, it’s wise to have them checked by a qualified mechanic to prevent road hazards.
FAQs
Can I remove rust from brake discs without removing the wheel?
Yes, you can remove rust from brake discs without removing the wheel by following a specific process.
Why is it important to remove rust from brake discs?
Rust on brake discs can reduce braking performance and cause noise. Regular maintenance ensures safe and effective braking.
Do I need to lift the car to remove rust from the brake discs?
Yes, lifting the car with a jack and using jack stands is essential for safety and accessibility.
Can I use regular household cleaners instead of brake cleaner?
No, it’s essential to use brake cleaner as it’s designed to remove brake dust and contaminants without leaving residue.
What’s the best way to wipe down the brake discs after cleaning?
Use clean, lint-free rags or paper towels to wipe down the brake discs thoroughly.
Is it necessary to reattach the wheel covers or hubcaps after cleaning?
Reattaching wheel covers or hubcaps is optional, but it can enhance the vehicle’s appearance.
How can I ensure that my brakes are working correctly after cleaning?
Lightly press the brake pedal before driving to check brake performance.
Can I use this method for severely rusted brake discs?
This method is most effective for surface rust. Severe rust may require professional attention or replacement.
Conclusion
In conclusion, maintaining and servicing your vehicle’s brake system is a vital aspect of ensuring both your safety and the proper functioning of your vehicle.
This guide has provided a step-by-step process for safely removing rust from brake discs without removing the wheel, including safety precautions, inspection, cleaning, reassembly, and brake testing.
However, it’s essential to remember that if you encounter significant brake disc damage, severe rust, or any doubts about your brake system’s performance, it is best to consult a professional mechanic for a comprehensive inspection and necessary repairs.